Today, on the arduino.cc forums, a user had the following problem: he wanted to start video in quicktime by pressing a custom button on an arduino. Basically, the arduino board should act as a simple keyboard for the computer.
I found this problem interesting and I ended up solving it. Here is the link to the forum.
Basically this problem has three parts.
1. An arduino sketch which, when the button is pressed, sends a character on the serial.
2. A serial-to-keystrokes program, which takes the character from the serial connection and converts it to a real keystroke
3. A program on the windows machine that translates the keystroke to whatever we want to do.
Sounds tricky? It’s actually easier than it sounds.
1. The Arduino Sketch
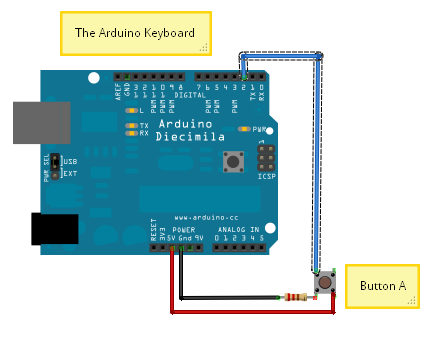
This is quite straight forward. The simple arduino keyboard circuit looks like this:

Here is a modified version of the Button.pde example that comes with the latest Arduino release. I have only added the lines required for the serial connection and a very long (2 sec) delay after the key is pressed; I used this 2 sec delay to keep things simple, but you may want to adapt the longer and more appropriate “Debounce.pde” sketch (also available as an example in the latest Arduino release) which takes care of the debouncing more efficiently.
1 2 3 4 5 6 7 8 9 10 11 12 13 14 15 16 17 18 19 20 21 | const int buttonPin = 2; const int ledPin = 13; int buttonState = 0; void setup() { Serial.begin(9600); pinMode(ledPin, OUTPUT); pinMode(buttonPin, INPUT); } void loop(){ buttonState = digitalRead(buttonPin); if (buttonState == HIGH) { digitalWrite(ledPin, HIGH); Serial.print("a"); delay(2000); } else { digitalWrite(ledPin, LOW); } } |
2. From Serial to Keystrokes
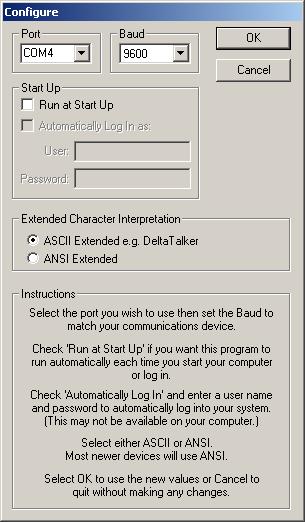
I found a very nice program, AAC Keys, which converts any characters the arduino sends to the serial port to actual keystrokes. This is available for both windows and Mac and it’s free to download; the download is a single executable file, which, when activated, stays in your system tray and monitors the serial port. The only thing you need to configure here is the port and the Baud rate:

Note that if AAC Keys is activated and configured, the arduino environment won’t be able to communicate with the arduino board, as the port cannot be shared.
At this stage, with the AAC Keys activated and configured, pressing the button on the arduino will create the character “a” on the computer.
3. Windows Shortcuts
What we need to do now is to somehow start playing a video with Quicktime. To play a video with QuickTime, all we need to do is to run the following command in a DOS window:
"C:\Program Files\QuickTime\QuickTimePlayer.exe" "C:\your video path\Video_A.avi"
If the video doesn’t start directly, then go to QuickTime >> Preferences >> Player Preferences… and select “automatically play movies when opened”.
My favourite windows program for these tasks is AutoHotKey. When AutoHotKey is installed, textfiles with the .AHK extension are executed by AutoHotKey.
The following AHK script, when executed, will stay in the system tray waiting for the “a” key (either from the keyboard or from the arduino board) to be pressed.
1 2 3 | a:: Run "C:\Program Files\QuickTime\QuickTimePlayer.exe" "C:\your video path\Video_A.avi" return |
…and that’s it! A simple (1-key) Arduino keyboard, which, when pressed, launches the video we want in quicktime.
There are many ways to extend this idea. More keys can be added (many can be added on a single analog port with resistors), and, with a bluetooth adaptor on the arduino board and the computer, we could even design a bluetooth keyboard for the computer! 🙂
what is the name of the application you used for
http://www.arkadian.eu/wp-content/uploads/2009/10/arduino-keyboard.png
I used to have it but for the life of me I can’t remember what it’s called 🙁
It’s called Fritzing: http://fritzing.org/. Still in alpha, but it looks great and works fine! 🙂